USBs (Universal Serial Bus) are the most portable device, making it easy to charge a device or transfer data between two devices and is compatible with every desktop and laptop. In the 90s, USB has continued to upgrade alongside technology and continuously become smaller, faster, and more powerful. If your PC doesn’t have an optical drive or has no DVDs, then a bootable stick is the best option. It is also quicker than optical drive as it boots faster, which installs the operating system quicker. People often try How To Install Windows 10 From USB flash drive, but unfortunately, they weren’t able to do it.
Is there any way to install Windows 10 from a USB drive? You will find the instructions on installing Windows 10 from a USB flash drive running Windows 10 from the USB flash drive. To activate Windows 10 on the USB drive, a license is required. Either purchase one or use an existing one associated with your digital ID. The program comes with three versions: Free, Professional, and Enterprise. Starting with the Free version, it has many limitations. Most notably, you can create an installation of Windows 10 Home but not Professional or Enterprise. The Professional version may cost you approx. $29, while Enterprise options will cost you $ 199. Also, ensure that the USB stick has UEFI (Unified Extensible Firmware Interference) boot support, as older PC basically operate on a basic input/ output system (BIOS).
Preparations:
-a tool to create Windows 10 bootable USB
-a USB flash drive with at least 16 GB of free space but preferably 32GB storage of pen drive for the smooth installation of the operating system.
-a PC where you can format your USB flash drive.
-a new PC where you can install Windows 10
Read More: Best Apple Laptops for Students 2021, check the list here
Then follow the following Steps to Install Windows 10 from USB:-
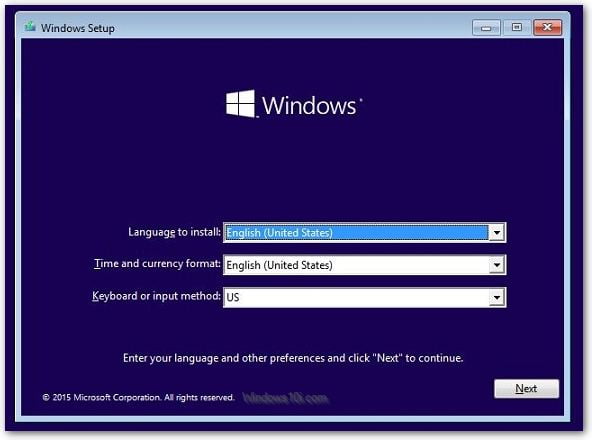
- To run the Windows from a USB, the foremost step is to sign into current Windows 10 and create an ISO file to install the operating system onto the drive.
- Browse to the internet to install the latest version of Windows 10. Then click the ‘’Download tool now’’ button on the webpage and double click the Mediacreationtool.exe file to install the program.
- Next, click the access button, select Create installation media (USB flash drive, DVD, or ISO file) for another PC, and then click the ok Next button.
- The next dialog box appears, asking you about which media you want to choose from the option USB flash drive or ISO files. Click the second option, which is ISO files, and hit the Next button.
- On your hard drive, choose the location to save ISO files. Click next when the process is done.
- Next, connect the blank USB flash drive and launch WinToUSB from the start menu. Click the button to the introductory screen to the Image file field’s right and choose the ISO file you created for Windows 10.
- Select the edition you have downloaded and clone it to the USB stick. The free version only allows you to install a Home version of Windows 10, so select the version and click Next.
- Then at the next screen, select your destination disk. Click on the drop-down menu and choose USB drive from the list. A message pops up asking for the partition scheme, select MBR for BIOS option and click Yes.
- To the next screen, choose the option Legacy. Click Next, and your Windows 10 USB drive is ready.
- After the process completes and reaches 100 percent, close the WinToUSB Program and eject the USB drive.
- Power up the computer and wait for it to detect the USB drive. Ensure that the USB stick is deducted, and select it as the primary boot device. The reboot must see the windows 10 installation media.
- Download the Windows 10 media creation tool from Microsoft.
- Run the media creation wizard to download the Windows 10 installation files, install WIN to USB, and then run it as administrator.
- Click the install icon button, then select the Windows 10 installation ISO files from the opened dialog box.
- Now chose option Windows 10 and selected it, and then from the drop-down list, select the USB Drive option.
- After selecting the USB drive, a pop up will appear asking you to format it to continue, tick the ‘’MBR for BIOS and UEFT’’ checkbox, then click YES.
- After clicking ‘’YES’’ WINtoUSB, it starts formatting. Please wait till the format operation completes.
- Select ‘’Next’’ after completed formatting the USB.
- WINtoUSB begins to install from USB after clicking ‘’NEXT’’.
- It takes some time to install. After installing, restart your computer and change BIOS to boot from the USB drive.
- As Windows 10 regular installation starts, we have to complete all the installation steps one by one. After that, you can install programs, copy files, etc.
The major drawback of booting from the USB device is that windows 10 will run slower than earlier as it slows down your hard drive.
Always ensure that the software must be downloaded and installed from the authorized website.
Also Read: Steps To Make A Steam Account On Mobile And Pc For Free